Posts

Showing posts from 2010

Solved Open Office asking for document recovery everytime

Is your open office asking for document recovery every time ? if your document doesn’t exist then also ? If Yes, then follow this document to solve your problem. Follow below steps to solve your problem :- To solve this problem :- For root :- Go to Terminal -> cd .openoffice.org/ /user/registry/ data/org/openoffice/Office/ There you will find Recovery.xcu [root@raghav Office]# ls Common.xcu Histories.xcu Linguistic.xcu Recovery.xcu Views.xcu Writer.xcu Remove Recovery.xcu Now try to open it will not ask you for recovery. For User :- Go to Terminal -> cd /home/ /.openoffice.org/ /user/registry/data/org/openoffice/Office/ There you will find Recovery.xcu [ub@raghav Office]# ls Common.xcu Histories.xcu Linguistic.xcu Recovery.xcu Views.xcu Writer.xcu Remove Recovery.xcu Now try to open it will not ask you for recovery. Let us know its work for you or not. Enjoy Open Source :)
How to install Partition Editor (GParted)

Open a terminal window and type in: sudo apt-get install gparted After that you can find GParted in the Gnome menu under System ->Administration ->Partition Editor

How to Remove Unneeded Fonts in Ubuntu

I really appreciate the fact that Ubuntu comes ready to use in multiple languages; the fact that Ubuntu and Linux in general serve an international community is one of my favorite things about the operating system. That being said, I don’t need a lot of the fonts that come in the basic install of Ubuntu, especially the ones with Arabic and Asian characters. While looking for a way to safely and easily remove these unneeded fonts in Ubuntu, I came across this thread at LaunchPad, advising the following command in a terminal: sudo apt-get remove ttf-kochi-mincho ttf-kochi-gothic ttf-arabeyes ttf-arphic-ukai ttf-arphic-uming ttf-baekmuk ttf-bengali-fonts ttf-devanagari-fonts ttf-gentium ttf-gujarati-fonts ttf-indic-fonts ttf-kannada-fonts ttf-kochi-gothic ttf-lao ttf-malayalam-fonts ttf-mgopen ttf-oriya-fonts ttf-punjabi-fonts ttf-tamil-fonts ttf-telugu-fonts ttf-thai-tlwg ttf-unfonts-core ttf-indic-fonts-core ttf-wqy-zenhei This worked excellently as a way to remove unneeded fonts in Ubu...

5 Steps to Setup User and Group Disk Quota on Linux

On Linux, you can setup disk quota using one of the following methods: * File system base disk quota allocation * User or group based disk quota allocation On the user or group based quota, following are three important factors to consider: * Hard limit – For example, if you specify 2GB as hard limit, user will not be able to create new files after 2GB * Soft limit – For example, if you specify 1GB as soft limit, user will get a warning message “disk quota exceeded”, once they reach 1GB limit. But, they’ll still be able to create new files until they reach the hard limit * Grace Period – For example, if you specify 10 days as a grace period, after user reach their hard limit, they would be allowed additional 10 days to create new files. In that time period, they should try to get back to the quota limit. 1. Enable quota check on filesystem First, you should specify which filesystem are allowed for quota check. Modify the /etc/fstab, and add the keyword usrquota and grpqu...

Ubuntu: Find Out Default Gateway

How do I find out default gateway IP address (default router IP assigned) for my Ubuntu Linux systems? Use the route or ip command to get default routing table for Ubuntu Linux. Open the terminal and type the following command: # route -n Sample outputs: Kernel IP routing table Destination Gateway Genmask Flags Metric Ref Use Iface 192.168.1.0 0.0.0.0 255.255.255.0 U 1 0 0 eth0 169.254.0.0 0.0.0.0 255.255.0.0 U 1000 0 0 eth0 0.0.0.0 192.168.1.1 0.0.0.0 UG 0 0 0 eth0 Destination for 0.0.0.0 is set to 192.168.1.1 via wlan0 interface i.e. 192.168.1.1 is default gateway. If you just type the route command with the -n switch it show word default instead of 0.0.0.0: route Destination Gateway Genmask Flags Metric Ref Use Iface 192.168.1.0 * 255.255.255.0 U 1 0 0 eth0 link-local * 255.255.0.0 U ...

Set the Default Browser and Email Client in Ubuntu

Image
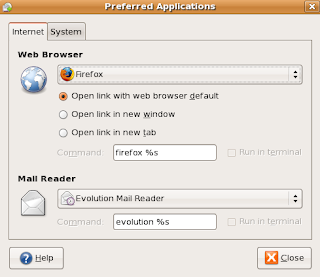
Ubuntu has a simple way to configure the default browser and mail client. Of course, Firefox is the default application for web browsing, so you shouldn’t ever need to use this screen, but if you insist, here’s how to do it. Navigate to System \ Preferences \ Preferred Applications Here you can specify which application you want to use for web or email links. For instance, if you are using Thunderbird for email instead of evolution, you can change that setting here.

Explains: UNIX / IT Sys Admin L1, L2, and L3 Support Levels

W hat is the definition of L1, L2 and L3 UNIX / Linux / IT support? What is the meaning of L1,L2 and L3 IT support? What is level of support for sys admin jobs? Generally L1, L2, and L3 support apply to any form of technical support such as mobile phones, electronics devices, computers, servers, and networking devices. All levels have different meanings and differ slightly from company to company and IT support groups. Basically, each person working at each level must have more experience and education in the field of support than its previous level. L1 is nothing but Level 1 support which is provided by a call center support person or engineer. L1 tech usually follows certain steps to solve the problem. In other words L1 will ask you various questions and some sort of software will be used to map your answers to further questions. L1 support takes your requests using the telephone, email or chat sessions. This kind of support engineers are are trained on the product with limited exp...

Ubuntu Equivalent of IPconfig

Easily view the network settings in Ubuntu, along the lines of the windows ipconfig /all command. The problem is that there is not one command in Ubuntu as all encompassing as the windows IPconfig command. So here is a list of various ubuntu commands that are equivalent to the various options of IPconfig. To view basic network settings: Windows: ipconfig Ubuntu: ifconfig To renew your network settings: Windows:ipconfig /release then ipconfig /renew Ubuntu: sudo dhclient To view your gateway: Windows:ipconfig /all Ubuntu: sudo route look for "default" To view your DNS settings: Windows:ipconfig /all Ubuntu: cat /etc/resolv.conf

Backing Up Data In Ubuntu Using sBackup

Image
In Ubuntu, it is surprisingly easy to backup your data. Gone are the days that require you to remember all the text line commands to type in the command prompt. With sBackup, you can easily backup your data with few clicks of your mouse. let me show you how. First, install sbackup sudo apt-get install sbackup After installed, two new entries will be found under System > Administration > Simple Backup Config, and Simple Backup Restore. Simple Backup Config is used to create or amend the backup job, while Simple Backup Restore is used after the disaster has occurred to restore the fil es . when you open "Simple Backup GUI" it will look like this: Under the General tab, there are three ways you can choose to backup your data: Use recommended backup setting Use custom backup setting Manual backups only If you are plain lazy and just to click, save and let it run by itself, you should choose the “recommended backup setting” . This will do a full backup every week and daily ...

Install anything in Ubuntu!

Having problem in installing anything in your Ubuntu OS.Take the terminal and issue the two commands that you can use are: sudo apt-get install PACKAGE and sudo aptitude install PACKAGE eg: For installing ssh server you have to issue sudo apt-get install ssh The sudo part of the command means you temporarily grant super-user/administrator rights to the command, provided you supply a correct user password It’s also possible to search from the command-line like it is in Synaptic. Try this: apt-cache search PACKAGE or aptitude search PACKAGE To find several packages related to what we’re looking for, together with brief descriptions apt-cache show PACKAGETo uninstall a package: sudo apt-get remove PACKAGE and sudo aptitude remove PACKAGE Removing configuration files as well: sudo apt-get remove –purge PACKAGE and sudo aptitude purge PACKAGE or sudo dpkg –purge remove PACKAGE

Scan to PDF using gscan2pdf in Ubuntu

Image
A GUI to ease the process of producing a multipage PDF from a scan. gscan2pdf should work on almost any Linux/BSD machine. Install gscan2pdf in Ubuntu You need to edit the /etc/apt/sources.list sudo vi /etc/apt/sources.list add the following line save the file and exit deb http://gscan2pdf.sourceforge.net/download/debian binary/ Now you need to update the source list with the following comamnd sudo apt-get update install gscan2pdf with the following command sudo apt-get install gscan2pdf This will install all the required packages. If you want to open gscan2pdf go to Applications--->Graphics--->gscan2pdf

Howto: Shutdown Linux Box Automatically

You may wonder - why should I shutdown the Linux box automatically? It depends upon your situation. For example, you are downloading couple of tar balls and you want to go home early. You can schedule a job to shutdown Linux after downloading is completed. Linux/UNIX/BSD/OS X comes with at and cron commands to automate task. Almost all common task can be automated using at command. Common Tasks For at Command 1. Shutdown/reboot the system 2. Email yourself files 3. Send birthday remainders Commands * at- Execute a task at a specific time. For example, shutdown computer, send birthday remainder etc. Useful to schedule one job at a time or a single future event. * cron – If you want to shutdown Linux box automatically everyday 8 pm then you need to use cron instead of at command (see below for examples). Useful to schedule recurring events or daily events such as backup data, or check system security etc. at Command Examples Let us see how to shutdow a Linux automatically at...

How to change computer name in Ubuntu

Computer name is normally given during the OS installing phases. But you could easily change the computer name with a simple GUI tool which is there in Ubuntu by default.There is a command line tool as well if you are so particular.GUI tool is simple and easy to use.Here is a step by step guide on how to change the computer name. Using GUI * Go to System -> Administration -> Networking * Network settings General Tab -> Host Settings -> Hostname: Specify the computer name * save changes and restart your computer. Using command line * Goto terminal and type the following sudo gedit /etc/hostname * Change your hostname Also take a look at /etc/hosts. And change your old name to your new one too.

How To Set A Static IP On Ubuntu 8.10

Due to a bug if you want to assign a static IP on Ubuntu 8.10 Desktop your setting will be overwritten after the next reboot because of a bug Solution Solution is to get down and dirty with the command line, it takes less than 2 minutes. Edit /etc/network/interfaces and enter the following values. sudo nano /etc/network/interfaces # The primary network interface auto eth0 iface eth0 inet static address 192.168.1.51 network 192.168.1.0 netmask 255.255.255.0 broadcast 192.168.1.255 gateway 192.168.1.1 And save it. Now move on to edit the /etc/resolv.conf. And add the name server. sudo gedit /etc/resolv.conf nameserver 192.168.1.1 If you don’t want to reboot the system restart the networking service instead. sudo /etc/init.d/networking restart

Installing Indian Rupee font in Ubuntu & Debian Linux

1) Download the font from Foradian Technologies blog. 2) Open a terminal & enter the following commands with root privileges/root user, mkdir /usr/share/fonts/ttf cp Rupee_Foradian.ttf /usr/share/fonts/ttf apt-get install ttmkfdir cd /usr/share/fonts/ttf ttmkfdir > fonts.scale mkfontdir cd /usr/share/fonts/ttf/ chmod 644 /usr/share/fonts/ttf/Rupee_Foradian.ttf 3) To insert the font in your document, type grave ascent(`) key, the one above tab key. You should have the new rupee symbol in your document. That’s it. Enjoy.............. :)

How to find your Linux Kernel Version.

Checking your Linux Kernel Version: Once your up and running with your favorite Linux distribution , you might find the need to install additional software packages or drivers. Some of these software applications or drivers can be specific to a Linux Kernel version in which case you will need to find this information. Finding the Kernel Version, Release information and Operating System from a running system is fairly straight forward and can be done directly from a terminal. Locating your Linux Kernel Version: Open up a terminal and type one of the following commands listed in bold text. uname -a prints all information uname -r prints the kernel release uname -v prints the kernel version uname -o prints the operating system

GShutdown – Schedule System Shutdown In Ubuntu

Image
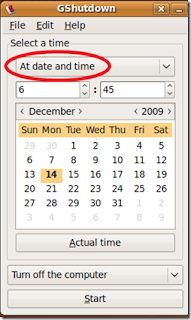
We have covered many tools which perform or schedule system shutdown in Windows, WinDown and Shutdown Agent are two examples. GShutdown is a tool for Ubuntu which performs and schedules system shutdown and restart. In order to install this application, open the terminal and run the following command: sudo apt-get install gshutdown Once the installation is completed, go to the Applications->Accessories->Gshutdown to launch it. Specify the time to shutdown or restart your computer and hit the Start button. You will find its icon located in the system tray (Known as Panel in Linux) for faster access. It works on Gnome, KDE and XCF desktop environments. Enjoy!

How To Change Minimum Password Length In Windows 2003 Server

Image
to specify a minimum legnth for passwords in windows server 2003, modify the local security policy and change the minimum pass word legnth option. to change the setting or properties, follow these steps: 1. go to: start > administrative tools > Local Security Policy or Domain Security Policy > Account Policy > Minimum password length then you will see a window like this. 2. make the changes and click ok that's it. hope this tutorial helps you

Outlook express unknown error Step by Step fix guide

Many of us have encountered quite a few Outlook express unknown errors. Some are just annoying, some are easy to deal with, while some are a real danger to your emails. One of these high-risk errors isoutlook express unknown error. How does it manifest and how do you fix outlook express unknown error? Let's find out! The error manifests itself when downloading e-mails. You will get and error message like below: "An unknown error has occurred. Account: 'name', Server: 'mail.raghav.com', Protocol: POP3, Port: 110, Secure(SSL): No, Error Number: 0x800C0133" It looks like a very nasty error! And it is! Your whole Inbox is corrupted. In Windows XP, Outlook's user files (extensions .DBX and .WAB) are by default marked as hidden. So you must make them visible. To view these files, in Windows Explorer, you must enable Show Hidden Files and Folders. Simply go to Start -> Control Panel -> Folder Options -> View. You should now see the files. Make sure t...

How to configure and maintain Additional Domain Controller step by step

Image
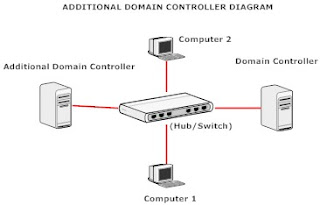
You can install additional domain controller, if you already have one main domain controller. Using additional domain controller, you can perform the proper load balancing as well as improve the reliability and availability of network resources. Perform the following steps to add additional domain controller to your windows 2003 server domain controller. There are some pre-requirement for install Additional Domain Controller. Operating system must be MS-Server 2003. One partition must be a NTFS partition with enough free space. Domain Controller must be configured DNS and TCP/IP settings must be configured. Computer must be connected properly (physically and logically) to other computers. Server end Configurations for Additional Domain Controller First click on start button to open Run option and type here "dcpromo" then press Ok button. Now windows active directory welcome page will appear, click Next button. ...

Ubuntu and HP LaserJet 1020 step-by-step

First get necessary tools: sudo apt-get install build-essential then download foo2zjs drivers wget -O foo2zjs.tar.gz http://foo2zjs.rkkda.com/foo2zjs.tar.gz untar tar -zxvf foo2zjs.tar.gz cd foo2zjs uninstall previous isntallations: sudo make uninstall build: make get HP LJ1020 firmware file: ./getweb 1020 install printers linux support: sudo make install install-hotplug cups

How to install OpenOffice.org 3 on Ubuntu 8.10

Ubuntu is coming by default with OpenOffice 2.4, so, I decided to upgrade to version 3. To do this, there are two methods, either install it from “http://ppa.launchpad.net/openoffice-pkgs/ubuntu intrepid main deb” repository or manually from files directly downloaded on the OpenOffice web site. I started by trying the installation from the repository because it’s much simpler. Here is how: First method : First, we need to remove OpenOffice 2.4 from our computer: sudo apt-get --purge remove openoffice.org-core After, we must add the repository “deb http://ppa.launchpad.net/openoffice-pkgs/ubuntu intrepid main” without the quotes to the file “/etc/apt/sources.list”. You can use gedit, kate or your favorite text editor like this: gksudo gedit /etc/apt/sources.list or kdesudo kate /etc/apt/sources.list We now need to add the public key of the repository : sudo wget http://monespaceperso.org/blog-en/files_blog/key_ppa_office sudo apt-key add key_ppa_office Once done, we must upda...

How To : Install Webmin In Ubuntu

Tired of using texts to administrate your ubuntu server ?. This How To will help you to Install Webmin in your Ubuntu box and make smooth administration. What is Webmin ? Webmin is a web-based interface for system administration in Unix or Unix like (i mean linux) systems. By using webmin in any modern web browser you can setup following things: User accounts Apache DNS File sharing etc., How To Install Webmin in Ubuntu ? To run webmin you need some perl libraries. Use the below code to install those libraries: sudo apt-get install perl libnet-ssleay-perl openssl libauthen-pam-perl libpam-runtime libio-pty-perl libmd5-perl Now download the webmin Debian package: wget http://www.webmin.com/download/deb/webmin-current.deb Install it using the command: sudo dpkg -i How To Install Webmin in Ubuntu ? To run webmin you need some perl libraries. Use the below code to install those libraries: sudo apt-get install perl libnet-ssleay-perl openssl libauthen-pam-perl...

Linux Applications You Must Be Familiar With If You Plan on Landing a Linux Job

Landing a Linux job really doesn’t have much to do with your school qualifications or what your resume says. With Linux, it’s all about experience. What you actually know will determine how far you get with a Linux job. Now, I’m not declaring that you must know everything listed in this article, but it’s important to be well versed in all aspects of Linux. Besides, if you plan to make Linux a part of your career, why not learn everything you can? In this document I will present you with Linux applications and what you should know about them at the very least. I then will present you with some outside links for further reading so that you can indulge and become more familiar with each Linux application listed. If you’re looking to land a Linux job you must be familiar with these Linux applications or daemons. Apache Apache is the Apache HyperText Transfer Protocol (HTTP) server program. A large portion of the Internet web sites you visit run Apache on the server the site is hosted on to...

Find out what IPs are on your subnet

Here is a quick tip on how to find out what host IPs are on your subnet using nmap. This is useful to find out what IPs are being used or just to know how many devices are connected to the subnet. # nmap -v -sP 192.168.1.0/24 You can replace the 192.168.1.0/24 address with whatever your IP and subnet is. Also, for a cleaner output that removes the lines that tell you an IP is not used, try the following: # nmap -v -sP 192.168.1.0/24 | grep -v "appears to be down"

How to configure static IP on Ubuntu

Do you use Ubuntu and wish to set a static IP for your machine? It’s simple. Follow the steps below to find out how. * Right click the network manager icon at the top right of your desktop * Select Edit Connections * Select Wired * Click the EDIT button * Click the IPv4 settings tab * Select Manual from the method drop down list * Click the ADD button to add your static IP address * Add your DNS addresses in the DNS servers field. You can separate each DNS entry with a comma * Click OK. * Restart networking using this command: /etc/init.d/networking restart